SOCKS tunneling via SSH
Contents |
If you're reading this, you probably know that most network connections, including web surfing, are unencrypted. So if you're sitting at Starbucks reading your email, the guy sitting a few tables down can also be reading your email (especially if he's me). Worse, he could be sniffing your passwords.
This is not limited to wireless networks. Even on a wired network, anyone who has physical access to the wire at any point between your computer and the destination server can see your packets. For example, the Great Firewall of China blocks Wikipedia by inspecting your network traffic and dropping requests it doesn't like.
If you don't need a lengthy explanation, you can jump straight to the good stuff (that last little section).
The problem
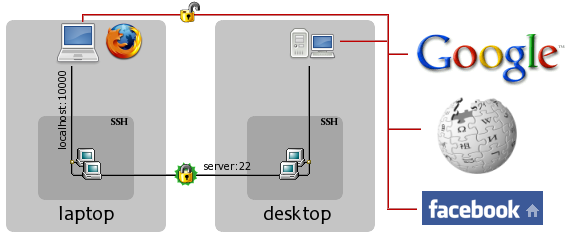
First, let's think about what is happening here. Let's say I'm at Starbucks and I want to go to Facebook to read some super-secret messages. Without tunneling, my data goes through the red, unencrypted channel in the diagram all the way from my laptop to the Facebook server. This is bad -- any random person who's within wireless range can now sniff the data moving between my wireless card and the access point, and I'd be none the wiser.
Solution overview
We can defeat these eavesdroppers by encrypting our wireless traffic. But somebody has to decrypt it -- we can't just send encrypted packets to Facebook, because their servers won't know what to do with them. So for this to work, we will need an intermediary, labeled "desktop" in the diagram.
In the new setup, the red unencrypted channel is partially replaced by the encrypted SSH connection between the laptop and desktop. The desktop decrypts data coming from the laptop and passes it to the remote server, and it encrypts data coming from the remote server and passes it to the laptop.
Note that in this setup, your data is encrypted between laptop and desktop,
but is still unencrypted for the journey between the desktop and the
destination server. This method is not a complete end-to-end solution; it only
works when the attacker is positioned between the laptop and desktop
machines as is the case with public wifi. Therefore, we want to position the
proxy machine (desktop
) such that the attacker is placed between it and
the vulnerable machine (laptop
). For example, in the case of China's
Great Firewall, the proxy machine will have to be outside China's borders.
For already-encrypted protocols like HTTPS, using SSH tunneling does still provide one key benefit: all SSH traffic looks the same, and it's all going to the same place (desktop), so an attacker can't tell what protocol you're using, who you're connecting to, etc. All he will be able to see is that there is some sort of SSH traffic between you and one particular machine.
Now on to actually getting this to work. It really couldn't be simpler.
Setting it up (the long version)
The server/proxy (desktop
)
Modern versions of OpenSSH can act as a SOCKS proxy and function as shown in the above diagram. Assuming you have a working SSH setup that allows you to login from the client to the proxy (laptop to desktop in this example), there is only one configuration setting to check. It's on by default, but you may want to verify that it hasn't been disabled. Look in /etc/ssh/sshd_config and make sure that the following line is either not present or is commented out:
AllowTcpForwarding no
If you have inadverdently disabled TCP forwarding on the server, then when you try to use the SOCKS proxy you will get errors like this:
channel 3: open failed: administratively prohibited: open failed
The client (laptop
)
All you have to do on the client is run ssh -D [bind_address:]port
user@server, where:
- bind_address optionally specifies the local interface that SSH will listen on for SOCKS connections, and in its basic form is just localhost
- port is the local port number to listen on. You should choose a high-numbered port because low ones require superuser privileges. As long as you don't pick one that's already being used (SSH will complain if you do), it doesn't matter which you pick.
In the example, I would do this on my laptop:
$ ssh -D localhost:10000 icydog@desktop.icydog.net
If you don't want SSH to take up your console, then you can additionally give it -f and N, so instead of the command above, it becomes:
$ ssh -fND localhost:10000 icydog@desktop.icydog.net
Now the tunnel should be set up. To use it, just point your SOCKS-aware
application at the port you chose earlier. For example, in the Firefox
connection settings, you would choose Manual proxy configuration, fill
in localhost and 10000 for SOCKS Host and
Port, and leave everything else blank.
Similarly, Gaim/Pidgin can be configured to use a SOCKS proxy by going to the Network tab of the Preferences dialog, choosing SOCKS 5 under Proxy type, and filling in the host/port (there is no username/password). If your program does not have SOCKS support, then you'll either have to try to set up a SOCKS wrapper like tsocks (really, really painful), or you'll have to use one of the other, less convenient SSH tunneling methods.
Setting it up (the short version)
If you have a good idea of what you're doing, the next couple of lines are
almost guaranteed to work if your configuration is somewhat sane. On the client
(laptop
), connect to your proxy (desktop
) using the -D
[bind_address:]port option, like this:
$ ssh -D localhost:10000 icydog@desktop.icydog.net
Then configure your browser/instant messenger/mail client to use the SOCKS 4 or SOCKS 5 (either one) on that port. That's it!